On-premise IoTRoutes
You can easily install an IoT Routes environment in your data center by downloading from github.com and installing the binaries on web servers of your choice. A minimal installation consists of:
- Install and configure a MongoDB database instance
- Install and configure the AOS server provided by IoTRoutes.
- Install and configure the IoTRoutes web client.
1. Database servers
IoTRoutes uses NoSQL databases for application configuration and to store IoT messages, as well as generated media or document files. MongoDB is optimized for the application and is also recommended for all on-premises installations. You can consult the documentation on the official MongoDB website for installation or cloud usage.
In production, it is strongly recommended to create separate databases for data and others for documents, generated reports, and media files.
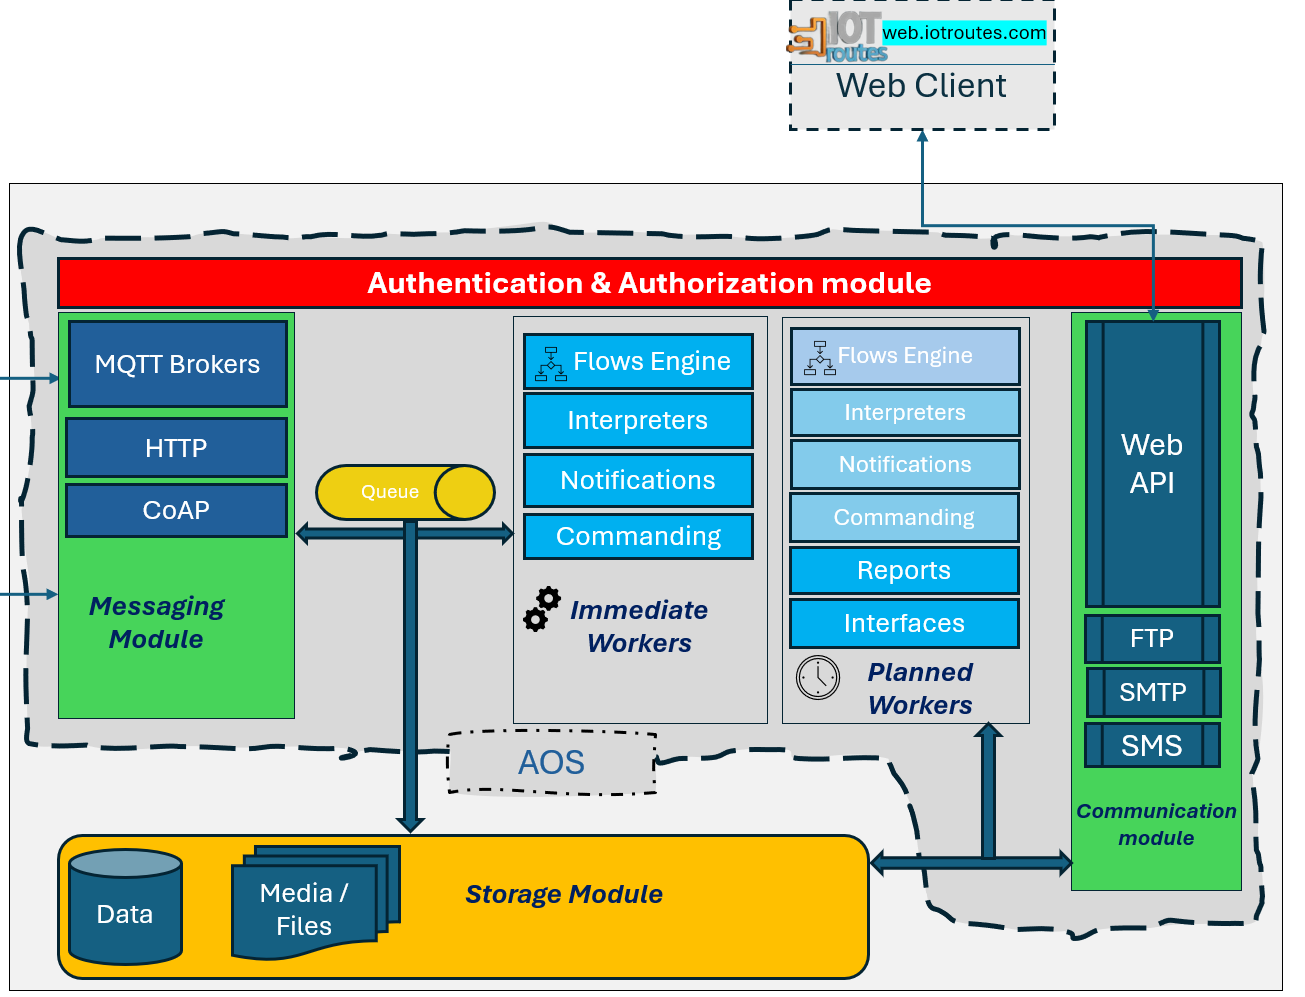
2. IoTRoutes AOS
IoT Routes AOS is deployed on a web server. After downloading and unzipping the files from the release page at https://github.com/IoTRoutes/iotroutes , please follow these steps to install and configure your servers.
➡ Windows deployment :
- Prerequisites:
- Windows Server (2012 R2 or later recommended)
- IIS installed (Web Server (IIS) role in Server Manager)
- .NET Hosting Bundle installed (matches AOS version downloaded, see downlod comments).
- Steps:
- Install and configure IIS as described in the official documentation, see this link.
- Install the .NET Core/.NET Hosting Bundle: From the link https://dotnet.microsoft.com/en-us/download/dotnet, search for "ASP.NET Core Runtime Hosting Bundle", download and install the program, then restart the server.
- Create a root folder to host the AOS under your IIS, for example, C:\inetpub\wwwroot\IoTRoutes-AOS, and copy the unzipped files you downloaded earlier.
- Open IIS Manager if it is still closed and configure the web application as follows:
- Add the AOS website: Right-click "Sites" and "Add Website." Enter the site name "IoTRoutes-AOS" and the path "C:\inetpub\wwwroot\IoTRoutes-AOS" (based on the folder created in step 3).
- Adjust the entries in the appsettings.json configuration file. This file contains the settings that allow the AOS to function. Please see the section below for the configuration file structure.
- Set the Application Pool to "No Managed Code": In the Application Pools window, search for or create the pool you want to use. Right-click the name and then click "Settings." Set the .NET CLR version to "No Managed Code." and set "Managed Pipeline Mode" to "Integrated."
- Check Permissions and Firewall: Ensure the folder has read/execute permissions for IIS_IUSRS and IUSR. The log folder must have Write/Modify permissions.
- Allow inbound traffic on the port you configured IIS to listen on (default: 80 or 443 for HTTPS).
- Restart the pool and test your site: Using a web browser, access http://<server-ip>/swagger/index.html
➡ Ubuntu deployment
To host IoTRoutes on Ubuntu, we use Kestrel as the web server and Nginx as the reverse proxy. Here are the main steps to follow for deployment on Ubuntu (20.04 or later). For more details on Linux commands, please refer to the appropriate documentation.
- Install the .NET SDK or Runtime on Ubuntu
- Add Microsoft apt repository
- Install the Runtime (.NET Core/ASP.NET)
Publish the AOS application to the server
On your workstation, where the IoTRoutes AOS files are unzipped, please open the appsettings.json configuration file and adjust the values according to your platform, such as the server address and the databases used. Please see the section below which describes the configuration file structure.
Then transfer the folder to your server, for example via SCP or rsync:
scp -r ./publish user@your-server-ip:/var/www/iotroutesAOS- Create a systemd service for the AOS application
- create the file :
sudo nano /etc/systemd/system/iotroutesAOS.service- For the contents of the file, please see the Ubuntu documentation..
Save, then run
sudo systemctl daemon-reexec sudo systemctl daemon-reload sudo systemctl enable iotRoutesApi sudo systemctl start iotRoutesApi- Test the AOS : sudo systemctl status iotroutesAOS
- Configure Nginx as a reverse proxy
- Install Nginx : sudo apt install nginx
- Create an Nginx config file: sudo nano /etc/nginx/sites-available/iotroutesAOS
- Edit content, please see Nginx documentation.
Activate the site :
sudo ln -s /etc/nginx/sites-available/iotroutesAOS /etc/nginx/sites-enabled/
sudo nginx -t
sudo systemctl restart nginx
Access and test the AOS web application
curl http://your-domain.com/iotroutesAOS/swagger
AOS configuration file
The file appsettings.json, contains configuration information such as database access settings and others.
- mongodbDataConnectionString : MongoDB database server connection string for Data database, example: mongodb://admin1:password1@serverName1:27017
- mongodbDataDbName : The application Data database name .
- mongodbFilesConnectionString : MongoDB database server connection string for files, documents and medias server, For small infrastructure, you can use the same database.
- mongodbFilesDbName: The application files buckets database name .
- Jwt_TokenLifetime :JWT Token expiration time for authentication in hh:mm:ss format
- Jwt_RefreshDuration : JWT Refresh Token expiration time.
- MQTTEndPointsURL : Not required for standalone deployment. For very large installations, this key contains the path to the MQTT port reservation strategy file. In case you want to create multiple AOSs and/or multiple Brokers per AOS. A template MQTTEndPoints file is provided under the AOS folder with the name MQTTEndPoints_template.json
- DefaultAdmin : For a new installation with an initial database, this section allows you to define the information for the first administrator account to be created and which will receive notifications. The default account is "admin" and you should specify a temporary password here that you will later change from the web client.
- ApiRateLimit : Defines the maximum number of API calls allowed per minute for each caller.
This setting acts as a gateway safeguard, helping protect the platform from abuse or denial-of-service attacks.
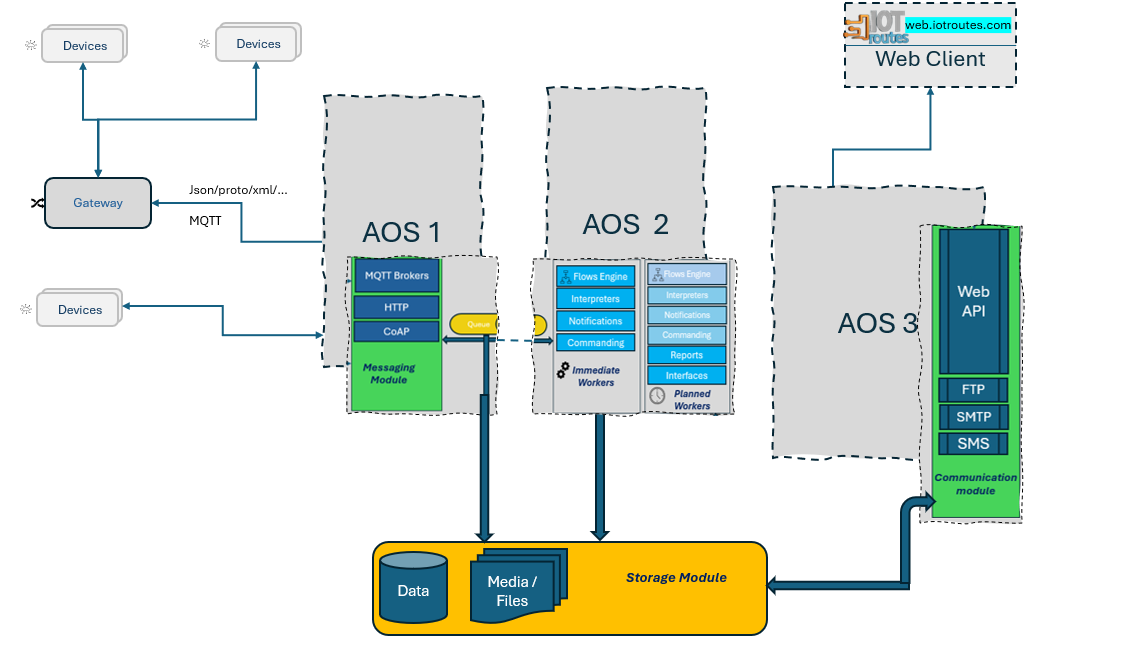
Horizontal scaling on a local environment
In large environments, multiple AOS instances can be run in parallel, leveraging a database configured for horizontal scaling and load balancing.
You can create one or more primary AOSs and one or more additional AOSs for load balancing. Each primary AOS contains its own database and zero or more additional environments to distribute work, message processing, or user access.
Below is a diagram for an example of an environment with 3 AOSs sharing the same database. The first AOS is dedicated solely to communicating with devices for receiving messages and sending commands. The second AOS is reserved for jobs and batch processing, while the third AOS is dedicated to user access via the web client or mobile applications.
Next : IoTRoutes on-premise Web Client